Today I want to talk to you about a wonderful type of planting arrangement for your culinary herbs. If you are into permaculture but you have no idea where to start, this is the absolute best thing you can do to get started! By the way, if you have no idea what permaculture is, you can find out by clicking here.
First, let me explain why I can say with such confidence that this is the best first project of any permaculture project. Bill Mollison said, “If you want to change the world, start at your back doorstep”. This system starts at the closest door to your kitchen for ease of access and follows the ethics and principles of permaculture.
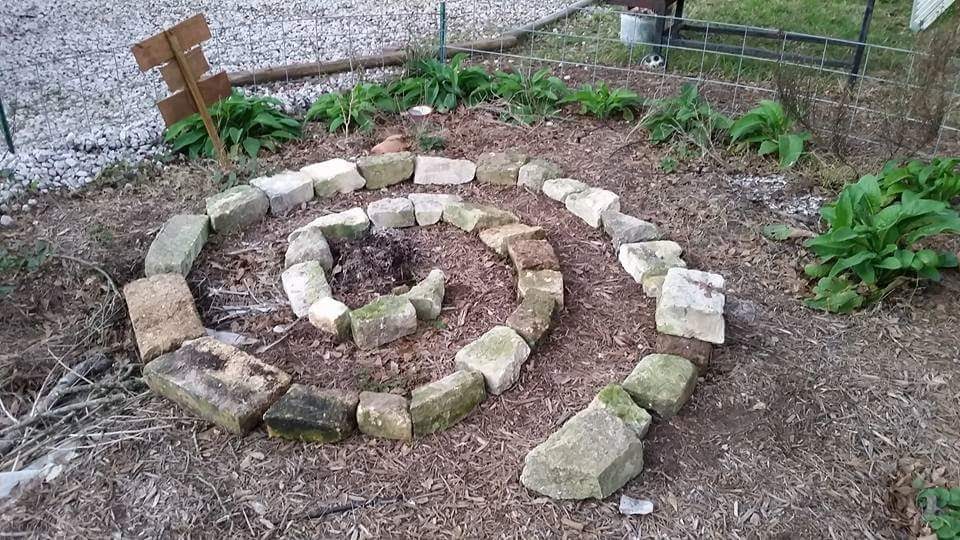
So, without further delay, let’s get right to it! Today we are talking about an herb spiral. What is an herb spiral? An herb spiral is a 6-foot wide and 3-foot tall circle that is built like a spiral, starting low at the bottom and ending up higher in the middle.
Why would I want to plant my herbs in a spiral and why would I want it just outside my door? Why not put my herbs in the garden like everyone else? Well, these are questions that will be addressed in this article. After that, we’ll get into the actual building of the herb spiral.
So, why would you want your herbs in a spiral? The answer to that is remarkably simple. It takes 30 feet of planting space and wraps it up into a 6-foot circle! That in itself is incredible, but there’s much more to it than that. By raising the center you also create many microclimates allowing for plants of different climate requirements to all coexist in a single location, which is also extremely convenient.

So why should you build one of these when you could just put your herbs in your garden. Well, I still recommend putting herbs in your garden, as they are very beneficial by bringing in predatory insects and pollinators, but the reason you want an herb spiral right outside the kitchen is for ease of access. Whenever you need fresh herbs, you can easily access the herb spiral without having to tread all the way out to the garden, another convenience factor.
There is so much room in a properly built herb spiral. Let’s get into the actual build. Ok, first you’ll need to choose a location. We have already decided it should be as close to the kitchen as possible, but you will need a location that gets at least 6 hours of sun per day and has a level surface or can be easily leveled. After you choose your location and make sure it’s level you’ll want to kill any grass if there is any remaining. There are a couple of ways to do that (please no herbicides!) and I suggest cutting the grass out, turning it upside down and then leveling. The other option is just to lay down a couple layers of cardboard or a thick layer of newspaper (no shiny paper).
Next, you need to choose your building material. This is completely up to you but some kind of stone is best as this will create habitat for lizards and other predators to help with pest issues. After choosing your material, layout your spiral. Some people use spray paint but I suggest a garden hose as that is free and is easy to change if you decide you want it different. When choosing the layout, make sure you have the start of the spiral at the bottom where you want it, either in the sunny or shady location. If you’re in the northern hemisphere, that will be the southern exposure. Vice versa in the southern hemisphere. I just used the rock to do the layout, and this was labor intensive because I did want to change it before getting started.

There is also the option of adding a small pond at the base of the spiral which will serve to grow water loving plants, attract frogs and reflect light back up to the plants to encourage winter growth. I have not yet added the pond to mine but that is planned for this fall once the temperatures cool down a bit. The pond can be very small, about 1 square foot or so is fine!
After you have the layout, start stacking the rocks. No mortar is needed and is actually discouraged because you want well-draining soil, especially on the top. I also suggest just every so slightly leaning the layers to the interior of the spiral, that way when you fill with soil, it will exert outward pressure and straighten up the structure.
After the structure is built, starting filling. Before adding soil, however, keep in mind we are building microclimates here and the raised portion is for well-draining soil requirements. I added broken bricks and old limestone driveway fill in the inner half of the spiral. Also, keep in mind that some plants actually like soggy soil. For the very outward and bottom spiral fingers, consider using a heavy clay based soil that will retain moisture well.

After that, fill it with soil.
The only thing left to do now is plant! Remember the microclimates! This is super important as you would not want to put rosemary at the bottom as it is a Mediterranean herb and hates wet roots! I put rosemary at the very top center followed by lavendar, thyme, oregano, a different variety of thyme, chives and green onions, cilantro/coriander, basil and dill. There is room for more and I’ll be planting more soon.


If you are into permaculture and want to start your first project, build an herb spiral. If you already have some permaculture established on your site but have not yet put in an herb spiral I highly encourage you to build one as soon as possible! The growth from this is amazing due to all the microclimates. We hardly water it, we never have bugs due to the lizards and frogs and we enjoy the simple beauty of this object just outside our patio!
If you have any questions or comments, please drop them in the form below. Happy growing!
[TheChamp-FB-Comments]


